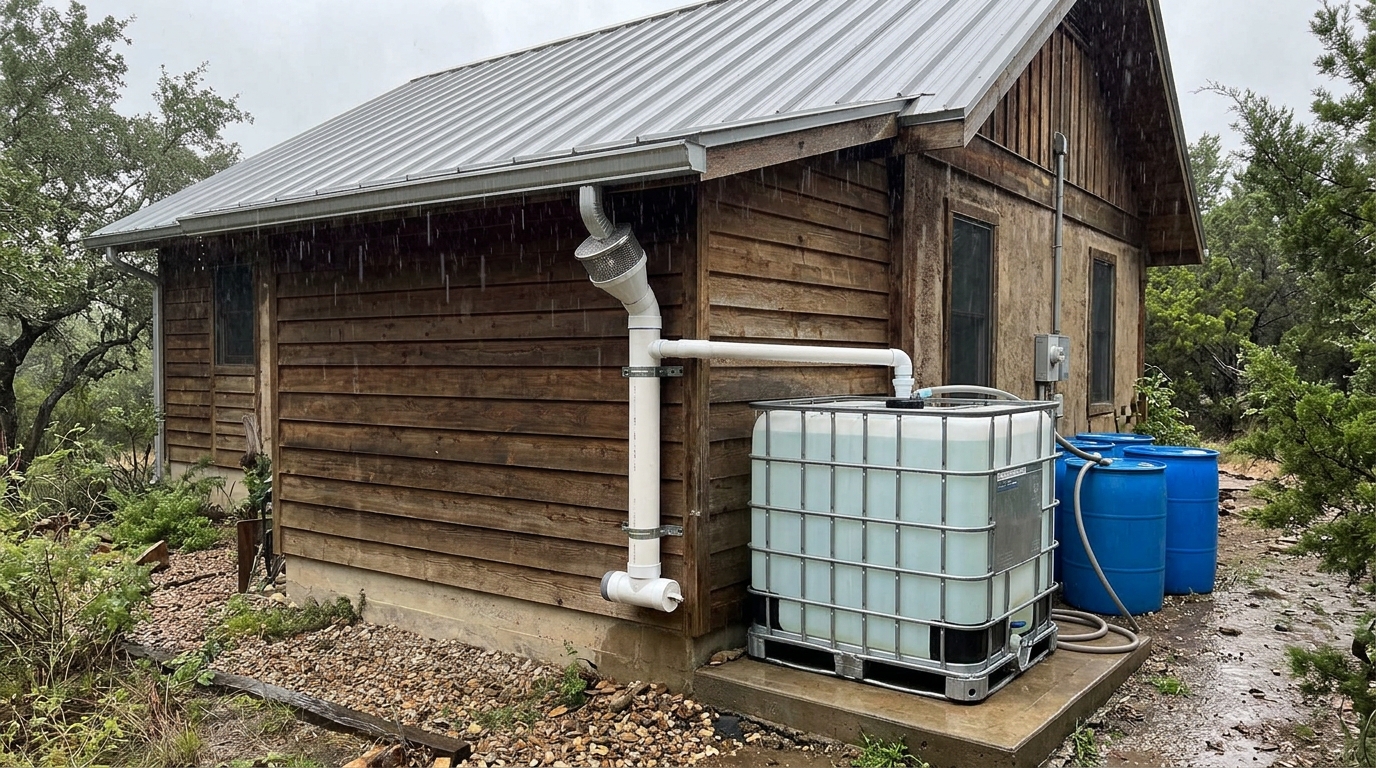
Storing water in drums and totes buys you breathing room, but every closed tank is a countdown clock. Once the city mains go dry and you start dipping toward the bottom bungs of your stored barrels, catching rain is what turns your property from a finite bunker into a system that actually refills itself[1][2].
You don’t need to be a hardcore prepper for this to pay off. Drive through the high desert out Southwest, and you’ll see cisterns hooked up to regular houses everywhere. When you only get a handful of summer storms a year, catching runoff off a metal roof is just common sense—it keeps gardens alive and takes the strain off your well. Emergency or not, the setup works the exact same way.
Where most folks mess this up is following the classic beginner advice: sticking a barrel straight under an open downspout. A roof isn’t a clean bowl; it’s a catch-all for bird droppings (Salmonella and Campylobacter), wind-blown grit, heavy metals, and dead leaves[3][4]. If you let that first dirty wash dump straight into your cistern, you’ll turn your drinking reserve into a foul, stagnant mess that plugs up sediment filters in a matter of hours[2][5].
Safety & Field Disclaimer: Rooftop runoff is untreated surface water and has to be purified before anyone drinks it[3]. Check your local and state rules before cutting into downspouts, and make sure your pad or slab can handle the full weight of a topped-off tank[1][13].
How Much Water Your Roof Can Actually Catch
Before you spend a dime on PVC fittings or haul tanks onto your property, run the math on what your roof can realistically deliver[2][7]:
Runoff (Gallons) = Roof Footprint (sq ft) × Rainfall (Inches) × 0.623 × Efficiency Factor (e)
Here is how those numbers work in practice. One inch of rain spread across a single square foot equals 0.6233 U.S. gallons[2][7]. When you measure your roof, measure the flat ground footprint—not the sloped shingle length. A 40 × 30 ft ranch house gives you a 1,200 sq ft footprint whether the pitch is a shallow 4/12 or a steep 12/12[2][8]. From there, you multiply by your efficiency factor (e) to account for water lost to wind drift, splash-out, and evaporation[2][8].
| Roofing Material | Efficiency Factor (e) | What Washes Off Into Your Water | Good Enough to Drink? |
|---|---|---|---|
| Standing-Seam Metal (Galvalume / Coated) | 0.90 – 0.95[2][8] | Very little—mostly airborne dust settled between rains | Best choice. Smooth, non-porous, and bakes clean under UV light[1][2]. |
| Glazed Clay / Concrete Tile | 0.80 – 0.85[2][8] | Trace calcium and fine mineral grit | Solid. Low toxicity; just needs good coarse screening[2]. |
| Standard Asphalt Fiberglass Shingle | 0.70 – 0.75[2][8] | Petroleum VOCs, PAHs, and heavy ceramic granule grit[4][9] | Restricted. Fine for gardens, or drinking only with heavy filtration[3][4]. |
| Cedar Shake / Untreated Wood | 0.50 – 0.60[2][8] | Heavy organic tannins and fungal spores[2] | Skip it. Plugs filters fast and eats up chlorine[2]. |
| Lead Flashing / Old Galv. Iron | 0.80 – 0.90[2][8] | Lead, corroded zinc, and copper runoff[3][4] | Never. Serious heavy-metal poisoning risk[3][10]. |
To put that into real-world numbers, a 1,500 sq ft standing-seam metal roof catching a steady 1-inch rain yields 888 gallons (1,500 × 1.0 × 0.623 × 0.95)[2][7]. A single decent thunderstorm will top off two 275-gallon IBC totes or sixteen 55-gallon drums—assuming your gutter throats and downspouts are wide enough to take the rush without spilling over the eaves[2][8].
What Your Roof Is Putting Into the Tank
If you are building a system for drinking water, factory-painted, baked-on enamel standing-seam metal or Galvalume is hard to beat[1][2]. Metal heats up fast in the sun, which helps kill off bacteria sitting on the panels between storms, and it doesn’t shed grit into your gutters[2].
Most suburban houses, though—over 75% of them—have asphalt fiberglass shingles[4]. Those shingles constantly shed fine mineral granules, leach trace polycyclic aromatic hydrocarbons (PAHs) as the sun cooks the petroleum binders[3][4][9], and often wash off copper or zinc from moss-resistant granules. If asphalt shingles are all you have, you can still harvest the water, but you cannot skip a proper first-flush diverter or dense carbon block filtration certified to NSF/ANSI Standard 53[4][11]. (For what happens after the tank, check out our guide to off-grid gravity water filtration systems.)
Dumping the First Dirty Flush
When a storm hits, the first wave of rain acts like a pressure washer, scrubbing weeks of bird droppings, soot, and road dust off your roof. Water testing shows that almost all the bacteria, turbidity, and dissolved junk ride in on the very first 1 to 2 millimeters (0.04 to 0.08 inches) of rain[5][6].
A first-flush diverter is just a vertical standpipe made of Schedule 40 PVC with a hollow floating ball inside and a rubber seat at the top—no pumps, no sensors, no power required[5][6]. When rain starts coming down the downspout, that first dirty batch drops straight through a tee into the empty vertical pipe below[6]. Once the standpipe fills up with the worst 10 to 50 gallons of roof wash[5], the hollow poly ball floats to the top and jams tight against the rubber gasket inside the tee[6]. With the dirty chamber sealed off, the clean rain behind it has nowhere to go except across the tee and straight into your storage tank[6]. At the bottom of the standpipe, a slow-drip bleed valve lets the dirty water drain out onto the ground over 24 to 48 hours so the ball drops back down and resets itself before the next storm rolls through[5][6].
Sizing the Standpipe So It Actually Works
The biggest mistake people make on a DIY rig is building a diverter pipe that’s too small. Diverting two gallons off a 1,500 sq ft roof barely rinses the gutters[5]. Size your standpipe to match how dirty your roof gets between storms[1][5]:
- Clean rural metal roof (1.0 gal per 100 sq ft): Open country, no overhanging trees, and regular rain[1][5].
- Average suburban lot (1.5 gal per 100 sq ft): Asphalt shingles, road dust, and a few trees nearby[5].
- Heavy tree cover or long dry spells (2.0 gal per 100 sq ft): Overhanging branches, heavy bird traffic, dirt roads, or three-plus weeks without rain[5][6].
When you buy your pipe, skip 4-inch PVC and go straight to 6-inch Schedule 40. Four-inch pipe only holds 0.66 gallons per vertical foot, meaning you’d need over 15 feet of height just to catch 10 gallons—way taller than standard 8-to-10-foot residential eaves. Six-inch PVC holds 1.50 gallons per foot, so a 6.7-foot vertical drop gives you that same 10-gallon capacity with room to spare[16].
Four Screens Between Your Roof and Your Tank
A good catchment rig filters out junk in stages before the water ever hits your cistern:
- Gutter mesh guards over the trough keep big leaves and twigs from clogging your outlets[2].
- A downspout leaf-eater (rain head) uses an angled 0.95 mm stainless steel screen to kick smaller debris off onto the ground while letting water drop straight through[6].
- The first-flush diverter traps the fine silt, bacteria, and roof grime below the screen[5][6].
- A 100-mesh tank inlet basket sitting in the cistern lid catches fine pollen and keeps mosquitoes out of your stored water[1][2].
Setting the Tank and Plumbing the Lines
Water weighs 8.34 pounds per gallon, and there is no negotiating with gravity[12]. A full 55-gallon drum runs about 480 pounds, a 275-gallon IBC tote hits roughly 2,418 pounds[12][13], and a 1,000-gallon poly tank pushes 8,600 pounds once you count the 260-pound tank itself[12][17]. Never set a bulk tank on soft dirt or a wooden deck. Put it on a level, compacted gravel pad or a 4-inch steel-reinforced concrete slab[1][13] (see our guide on long-term potable water storage for full load numbers).
Inside the tank, two simple plumbing tricks keep your water clear. First, run your inlet pipe all the way down the inside wall to the bottom and finish it with an upward-facing U-bend. That “calmed inlet” stops incoming storm water from blasting the bottom of the tank and stirring up settled silt[1][6]. Second, hook your outlet to a flexible hose suspended from a hollow float ball 6 to 8 inches below the surface. That way you’re always pulling the cleanest water in the tank—staying well below any floating pollen on top and safely above whatever sludge settles on the floor[1][6].
Keeping Winter Ice From Splitting Your Pipes
Water expands by about 9% when it freezes, building up 20,000 to 30,000 PSI of pressure that will split rigid Schedule 40 PVC like kindling[14][15]. Before the first hard freeze, throw a manual bypass valve on your downspout to send winter snowmelt straight onto the ground[14]. Take the bottom cap off your vertical first-flush pipe and leave it open all winter so meltwater can’t pool inside and freeze solid[14]. If you keep water in an outdoor cistern through freezing weather, leave at least 15% air space at the top and drop in a couple of half-full, tightly capped HDPE jugs weighted with pea gravel—they’ll crush inward and absorb the sideways pressure as ice forms[14].
Putting It Into Practice
If you want a system you can trust when the grid goes down, keep the build straightforward: catch off painted standing-seam metal if you can (or run asphalt-shingle runoff through an NSF/ANSI 53 carbon block)[1][4][11], size your 6-inch diverter pipe for at least 1.5 gallons per 100 square feet of roof[5][6], and keep sediment undisturbed with a leaf-eater screen, calmed inlet, and floating draw hose[6]. Once the cistern fills, treat every gallon as raw surface water—run it through an off-grid gravity water filtration system or treat it with emergency chemical water disinfection before it goes into a glass[3][11].
Technical References & Sources
- Texas Water Development Board (TWDB) – The Texas Manual on Rainwater Harvesting, 3rd Edition (2020). ↩
- American Rainwater Catchment Systems Association (ARCSA) & ASPE – Standard 63-2020: Rainwater Catchment Systems (2020). ↩
- Centers for Disease Control and Prevention (CDC) – Rainwater Collection: Potential Health Risks, Contaminants, and Safe Use Guidelines (2024). ↩
- U.S. Environmental Protection Agency (EPA) – Rooftop Runoff Quality and Contaminant Leaching from Common Roofing Materials, Technical Bulletin 600/R-14/150 (2022). ↩
- Doyle, R., & Gardner, E. (Journal of Hydrological Engineering) – Evaluating First-Flush Diversion Volume Requirements for Urban and Rural Rainwater Cisterns, Vol. 26(4) (2021). ↩
- Rain Harvesting Pty Ltd – First Flush Water Diverter Sizing, Flow Dynamics, and Hydraulic Check-Valve Mechanics (2024). ↩
- U.S. Geological Survey (USGS) – Rain and Precipitation Runoff Calculations and Conversion Formulas (2023). ↩
- International Association of Plumbing and Mechanical Officials (IAPMO) – Uniform Plumbing Code (UPC), Chapter 16: Nonpotable and Potable Rainwater Catchment Systems (2021). ↩
- Mendez, C. B., et al. (Water Research) – The Effect of Roofing Material on Water Quality for Rainwater Harvesting Systems: PAHs and Microbiological Assessment, Vol. 45(5), 2041–2052 (2011). ↩
- World Health Organization (WHO) – Guidelines for Drinking-Water Quality: Chemical Contaminants from Roof Runoff, 4th Edition (2022). ↩
- NSF International – NSF/ANSI Standard 53: Drinking Water Treatment Units – Health Effects (2025). ↩
- Engineering ToolBox – Water Density and Specific Weight Across Operational Temperatures (2022). ↩
- International Code Council (ICC) – International Residential Code (IRC), Section R301.5: Minimum Uniformly Distributed Live Loads and Foundation Slabs (2021). ↩
- U.S. Army Public Health Center – Cold-Weather Water Storage, Freeze Prevention, and System Winterization, Technical Guide 318 (2021). ↩
- National Research Council of Canada – Phase Change Expansion Pressures of Confined Water in Rigid Polyethylene and Metallic Conduits, NRC Publications Archive (2020). ↩
- Charlotte Pipe and Foundry – PVC Schedule 40 & SDR-35 Pipe Dimensions, Wall Thickness, and Internal Capacity Specifications (2023). ↩
- Norwesco Inc. – Vertical Polyethylene Water Storage Tank Specifications: 1,000 Gallon Tare Weight & Footprint (2024). ↩